Recipe: Peanut Butter Oatmeal Monster Cookies

|
This cookie recipe was posted on The Kitchn sometime last week and it looks delicious. While these are still incredibly bad for you, at least they are whole-grain and gluten-free. At the very least, a small, delicious step in the right direction!

I was planning to make these last weekend for a cookout but it didn't end up happening so I'll be saving this recipe for a summer cookout in our new house!

Peanut Butter Oatmeal Monster Cookies

About 3 dozen cookies

1/2 cup (1 stick) butter, slightly softened
1 1/2 cups creamy natural peanut butter, well-mixed
1 cup brown sugar
1/2 cup white sugar
3 eggs
1 tablespoon vanilla
2 teaspoons baking soda
4 1/2 cups old fashioned oats
About 1 cup chocolate candies or other mix-ins

Preheat oven to 350F and line two large cookie sheets with parchment paper.

Cream butter, peanut butter, and sugars. Beat in eggs and vanilla. Beat in baking soda, then oatmeal and mix-ins.

Drop onto cookie sheets with an ice cream scoop and flatten slightly. Bake at 350F for 8-10 minutes or until done. Do not overbake!

Remove from oven when slightly golden. Let cool on the sheets for a few minutes until they have firmed up enough to remove to wire racks.

Original Collector: Me

Decorating Inspiration

|
This past month I've been busy collecting lots of decorating inspiration for our house. I am ridiculously excited to have a house to decorate, a blank canvas for all of my ideas. Living in apartments for the last 5 years has been very limiting when it comes to personal style. Below are my two favorite photos which were featured in an article on Apartment Therapy.

I envision our living room looking a lot like the photo above. Our couch and chair are the same beige as this one and we're painting the walls blue. We'll throw in some cool prints with the pillows and there you have it: our living room.
I LOVE this photo, I love every element here, I want to move right into this place! I would love to have this living room but we've already got that design covered. We are, however, using this same color scheme for our kitchen and dining room. Gray walls with white trim, golden yellow and brown as accent colors - Its going to be excellent, I'm stoked, enough said.

Friday, May 29, 2009

Our House

|
Here it is, the reason I've been completely MIA for nearly a month.....our house! We have been insanely busy running here and there, doing one thing or another for the house almost every single night this past month. We should be closing on the house next week, we should have closed on May 20th but I've come to learn that this stuff does not always go according to plan...actually, it never goes according to plan. We've had about 50 different plans at this point and none of them have worked out.

Anyway, I've still been busy collecting some good stuff so hopefully I'll have a few days to make some posts before the real craziness begins. This house has already been a lot of sweat and tears on our part and I'm sure the blood is soon to come with all the moving and painting.

I'll post more photos of the house in the future, after we get moved in. Hopefully some good before and afters!


Friday, May 29, 2009

Recipe: Fleur de Sel Caramels

|
Here is the recipe for the homemade caramels that may be making a show at our wedding. I've always wanted to give homemade caramels a try and if I do make them as wedding favors you can bet that I'll be testing out the recipe several times. Yum!


Recipe from Cookbook Catchall
Original recipe from Barefoot Contessa
Fleur De Sel Caramels
Vegetable oil
1 1/2 cups granulated sugar
1/4 cup light corn syrup
1 cup heavy cream
5 tablespoons unsalted butter
1 teaspoon fleur de sel, plus extra for sprinkling
1/2 teaspoon pure vanilla extract
1. Line the bottom of an 8-inch-square baking pan with parchment paper, then brush the paper lightly with oil, allowing the paper to drape over two sides.
2. In a deep saucepan (89 diameter by 4 1/2" deep), stir together 1/4 cup water with the sugar and corn syrup and bring them to a boil over medium-high heat. Continue to boil until the mixture is a warm golden brown color. Don't stir — just swirl the pan to mix. Watch carefully, as it will burn quickly at the end!
3. In the meantime, in a small pan, bring the cream, butter, and 1 teaspoon of fleur de sel to a simmer over medium heat. Turn off the heat and set aside.
4. When the sugar mixture is a warm golden color, turn off the heat and slowly add the cream mixture to the sugar mixture. Be careful! It will bubble up violently. Stir in the vanilla with a wooden spoon and cook over medium-low heat for about 10 minutes, until the mixture reaches 248°F (firm ball) on a candy thermometer. Very carefully (because it's hot!) pour the caramel into the prepared pan and refrigerate until firm.
5. When the caramels are cold, use the parchment paper to pry the sheet from the pan onto a cutting board (note: the caramels will still be supple and easy to handle – if too stiff, allow to sit at room temperature for 10 minutes). Using the parchment and starting from the long side, tightly roll the caramel up until you have rolled 1/3 of it. Cut along the edge and repeat two more times. Use the parchment to gently roll each log to even out the thickness and smooth out the seam from the cut side. Cut each roll into 8-10 pieces, taking care not to touch the caramel with your finger. Sprinkle each piece with fleur de sel and wrap individually in glassine or parchment paper. Store in the refrigerator and serve the caramels chilled.

Original Collector: Me

DIY: My Wedding Favors

|
I'm currently debating between these 3 wedding favors:
from The Knot
Caramel apples bought from Huber's Orchard in Indiana (delicious) - with custom wrapping.

From Cookbook Catchall

Homemade caramels by me - packaged in some cute container.

Small homemade jars of apple butter (the first recipe I posted!) - This would be extra special but lots of work (well, for my dad) haha.

All three of these ideas would be excellent for our fall wedding....I want something that's more unique than jordan almonds and other candies and I think these are all great ideas.... I just can't decide! Thoughts?
Saturday, May 02, 2009

DIY: My Wedding Cake

|
Photo here
As I mentioned in the DIY recipe cards post, I've been thinking about having a cake bar instead of a traditional wedding cake. These photos are some of my inspiration. I love vintage cake plates.... I also love baking cakes. Having a homemade, old fashioned cake bar would be a perfect fit for our style of wedding.

Photo here <- this blog is great, I love her tag line: Creative. Thrifty. Sane. I like to believe that about myself as well.

Photo here

Taking on the task of making the cakes will be incredibly stressful - what if I burn them?! I'll be testing out cake recipes before the wedding and posting them on here! We'll see how those go and then I'll decide if I can handle it.
Saturday, May 02, 2009

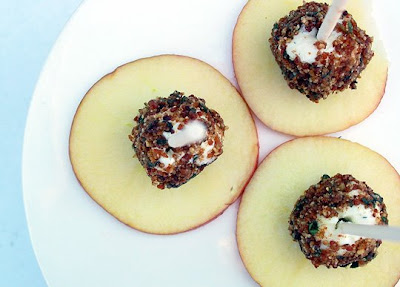
Recipe: Cheese Pops with Herbs, Pecans, & Bacon

|
There must be a new trend in serving food on sucker sticks - well, not that new but they are all shaped like these pops. Forget the cake pops, these look even better and again, perfect for a party or shower. While these are essentially individual size cheese balls, I'm 900% sure you can't go wrong by making them! Maybe I'll collect enough of these recipes to have a whole party with the theme of food pops - that would be incredibly.....dorky.


Click here for recipe and instructions.


Original Collector: Me

Recipe: Cake Pops

|
These look like SOO much fun to make but unfortunately, I don't have an occasion for them now. They would be perfect for any sort of shower or for a birthday party (*Tony, take notes*). I'm filing these away for a later date but you better believe I'll be making them. If no special occasions come up soon, I'll be serving them to my friends at a cookout!


Click here for the recipe and instructions
Original Collector: Me

DIY: Recipe Cards

|
It's no secret that I love collecting recipes so what better project than DIY recipe cards? I've thought about designing my own card (that matches our handmade invitations and other wedding stationary) and including a special family recipe to give as another favor at our wedding. I've also considered having a cake bar with several different old-fashioned layer cakes instead of a traditional wedding cake - I could share those cake recipes on cards and display them on the cake table for people to pick up as they get a piece of cake. I'm not sure if I'll use these ideas but I'm definitely going to design my own recipe cards to have on hand because well, why not? They're great, I love them and they would make great gifts!


You can find recipe card templates for the ones above at Etsy and Apartment Therapy. For a small price you can download the template and customize it to your own preference but with a little creativity, card stock and printer you can make your own 100% customized card so... why not?
Thursday, April 23, 2009

Recipe: White Bean Dip

|
I love hummus and other bean dips to the point that I could eat them almost everyday. I've never made my own hummus or bean dip but I've been dying to for the longest time. Reason why I've never made it: I don't own a food processor. Sure, I could do small batches in a blender but it would be more trouble that it's worth. Remedy: Food processor is definitely going on our wedding registry... I'll make hummus and dips and pestos until they are coming out of our ears! This recipe looks simple so it's on the list for tryouts.

Recipe from Cookbook Catchall
White bean dip
1 lb dried white beans such as cannellini beans
1 medium yellow onion, coarsely chopped
2 cloves garlic, crushed
2 sprigs fresh thyme
Olive oil
Freshly ground black pepper
Sea salt
Italian flat leaf parsley for garnish
Soak beans overnight in a generous amount of cold water. Rinse and pick out any debris. In a large, heavy-bottomed pot, sauté onion and garlic with thyme in a few tablespoons of olive oil until onions are translucent. Add beans and cold water to cover beans by a few inches. Bring to a full boil and then reduce heat to a simmer. Cook until beans are tender 1-2 hours. Remove thyme.
Drain beans and place in blender with ¼ cup olive oil and a generous sprinkling of salt and pepper. Purée, adding additional olive oil slowly to adjust texture as desired. Finish with a sprinkling of chopped parsley, sea salt and pepper and a drizzle of olive oil.
Original Collector: Me
Thursday, April 23, 2009